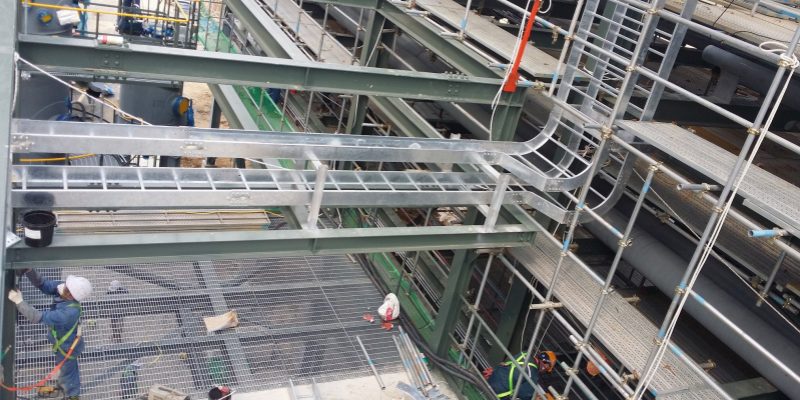
Cable trays are essential components in modern electrical installations, providing a safe and efficient pathway for the routing of cables. They help in organizing cables, reducing clutter, and preventing damage from environmental factors. The proper management of cables is crucial to ensure the safety, performance, and longevity of electrical systems. One key feature in cable tray systems is the use of cable tray dividers. These dividers play a critical role in maintaining organization, ensuring cables are routed separately, and preventing interference. Proper cable tray divider installation is essential to achieve these benefits, ensuring that the dividers are securely placed and provide effective separation between different cable types. Guide to cable tray divider installation for safe, organized cable routing in ladder or ventilated trough trays.
What is a Cable Tray Divider Installation?
A cable tray divider is a crucial component in cable management systems, designed to separate and organize different types of cables within a cable tray. It is a partition that fits into the tray, providing physical barriers between cables to ensure they are properly routed and do not become tangled or interfere with each other. These dividers are made from various materials, including metal and plastic, and come in different sizes and configurations to suit the specific needs of a cable installation.
Definition of Cable Tray Dividers
A cable tray divider is essentially a partition that creates individual compartments within a cable tray. The primary purpose of this component is to prevent cables from coming into direct contact with each other, reducing the risk of interference, electrical shorts, or signal degradation. By incorporating a cable tray partition, distinct pathways can be created for different types of cables, such as power cables, communication cables, and data cables, helping maintain a clean, organized, and efficient cable management system.
How Dividers Enhance Safety and Efficiency in Cable Tray Systems
The proper installation of cable tray dividers greatly enhances both safety and efficiency in cable management systems. By clearly defining spaces for each cable type, dividers reduce the risk of accidental damage to cables, such as cuts or abrasions, which can lead to system failures or electrical hazards. Additionally, a well-organized tray makes it easier to identify issues such as overheating cables or damaged insulation, improving the overall maintenance process.
Moreover, a cable tray divider installation improves the longevity of cables by preventing them from being exposed to unnecessary physical stress, which is particularly important in high-traffic areas or environments with high temperatures. Dividers also help with compliance to safety regulations, as they can be designed to accommodate fire-resistant or other protective features depending on the application, ensuring that the system meets industry standards.
Cable tray dividers are vital for creating a safe, organized, and efficient cable management system. Their proper installation can significantly enhance the overall performance and safety of electrical and data networks.
Common Uses of Cable Tray Dividers
Separating Power and Data Cables
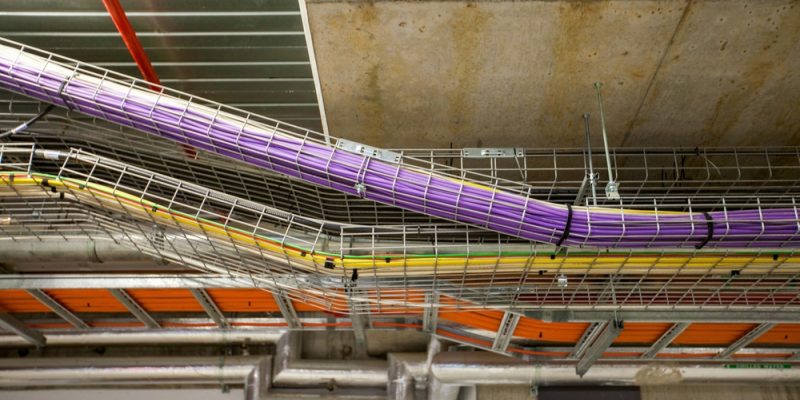
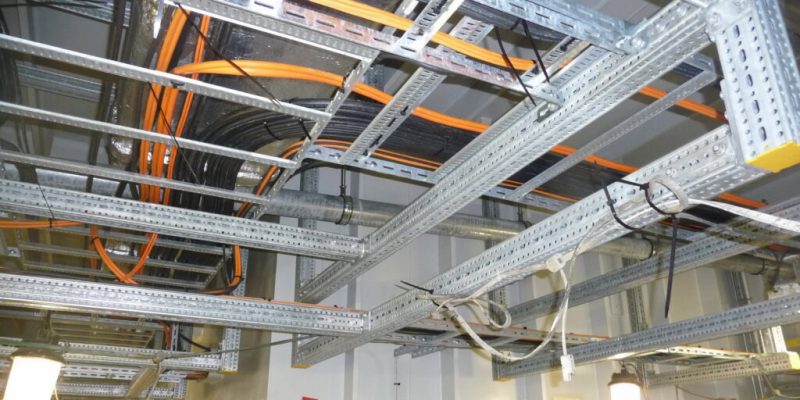
Dividers separate power and data cables within the tray, minimizing the risk of interference between high-voltage and low-voltage cables. This separation is crucial as electrical interference can disrupt the performance of sensitive data cables. By ensuring both systems stay separated, dividers improve performance, reduce signal degradation, and prevent equipment malfunctions. This enables both systems to work without causing interference with each other, improving overall system efficiency and safety.
Reducing Interference
In installations with high-voltage power cables running alongside data cables, cable tray dividers serve to reduce electromagnetic interference (EMI). Power cables emit electromagnetic fields that can disrupt data transmission, causing signal loss, noise, and system failure. Dividers act as physical barriers to shield data cables from EMI, ensuring clear and reliable signal transmission. This is particularly important in environments like data centers and telecom rooms, where uninterrupted data flow is critical for system performance and reliability.
Improving Cable Organization
Cable tray dividers improve the organization of cables by separating them into distinct sections. This prevents cables from becoming tangled, making it easier to manage a large number of cables. Dividers also simplify maintenance and troubleshooting by making cables easily accessible and identifiable. Additionally, an organized cable tray allows for easy upgrades or modifications, enabling the addition of new cables without disturbing the existing system. This helps maintain a streamlined and efficient cable management setup.
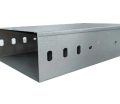
Durable Flat Cable Tray for Efficient Cable Management
Types of Cable Tray Divider Installation and Their Applications
Cable tray dividers come in various types, each suited to different installation needs and environments. Choosing the right high quality types of cable tray dividers during cable tray divider installation can significantly improve organization, safety, and efficiency. These dividers help prevent interference and ensure cables are securely separated. For systems that require flexibility, adjustable cable tray offer the ability to adapt to changing cable configurations, making them ideal for setups that need frequent modifications or custom routing.
| Type of Divider | Description | Applications | Advantages |
|---|---|---|---|
| Solid Dividers | Unbroken barrier for full separation. | High-security areas like data centers. | Reduces interference, enhances safety. |
| Perforated Dividers | Features holes for ventilation. | Areas needing heat management. | Provides ventilation, prevents overheating. |
| Flexible Dividers | Can be bent to fit different layouts. | Systems with changing or custom routing. | Versatile, easy to adjust and install. |
| Adjustable Dividers | Easy to adjust for changing needs. | Systems with evolving cable requirements. | Affordable, lightweight, easy to install. |
Innovative Magnetic Cable Tray for Cable Management
Step-by-Step Guide to Cable Tray Divider Installation
Proper installation of cable tray dividers is essential for ensuring efficient, organized, and safe cable management. Whether you’re installing dividers in a standard cable tray or a more complex system, following the right steps will help optimize the system’s performance. In this step-by-step guide to cable tray divider installation, we will cover the pre-installation checklist, the installation process, and specific considerations for connecting dividers to cable ladder.
Pre-Installation Checklist
Before beginning the cable tray divider installation, it’s crucial to gather the necessary materials and tools and ensure that the installation complies with safety standards. Proper preparation will save time and help ensure a smooth and successful installation.
Materials and Tools Needed
Make sure you have the appropriate cable tray dividers, which could be solid, perforated, or flexible, depending on your specific needs. Check that the cable tray system is ready for installation and that it has been correctly installed according to your layout plan. Gather the required tools, including a measuring tape, a pencil for marking, screws or fasteners, a drill with bits suitable for tray materials, and a wrench or screwdriver. Ensuring that all materials and tools are available and in good condition will help streamline the installation process.
Site Preparation
Ensure the installation area is easily accessible by removing any obstacles such as equipment or furniture that might obstruct your movement during installation. Also, check the floor or surface where the tray will be mounted to ensure it is level and free from debris that could interfere with the tray’s alignment. Having a clear, clean, and level workspace will make the installation process more efficient and prevent any alignment issues.
Compliance with Safety Standards
Ensure that your installation complies with all local electrical codes and safety regulations, including guidelines for fire resistance, spacing between cables, and tray strength. Always wear appropriate safety gear, such as gloves, goggles, and work boots, to protect yourself from sharp edges and other hazards. Lastly, make sure there is enough space around the cable tray for easy access and future maintenance, ensuring both safety and functionality.
Installation Process
Marking the Cable Tray
Measure and mark the points on the cable tray where the dividers will be placed. Ensure that the measurements are precise for consistent spacing. Use a pencil or chalk to mark these points clearly, ensuring the dividers are installed evenly across the tray. Accurate marking ensures that dividers are properly aligned and helps maintain a well-organized cable management system.
Preparing the Cable Tray
Clean the cable tray by removing dust, debris, or any obstructions. This ensures a smooth, clean surface for divider installation. A clean tray reduces the risk of dividers shifting or not securing properly. If necessary, remove any old dividers or cables that could interfere with the new installation. This preparation step is essential for a successful, secure divider setup.
Securing Solid Dividers
For solid dividers, position them according to the markings on the tray. Attach them securely using screws or bolts. Ensure the divider is tightly fastened to prevent movement or misalignment. If the tray is perforated, align the holes of the divider with those on the tray to ensure a strong, stable connection. Tight fastening is crucial to prevent dividers from shifting during use.
Securing Flexible Dividers
Flexible dividers should be attached using clips or fasteners, providing the ability to adjust their position. Ensure the dividers are spaced evenly and aligned to maintain an organized cable route. Adjust the dividers as necessary to accommodate cable sizes and ensure proper separation between different cable types. This flexibility ensures that cables remain well-organized and that the system can be easily modified if needed.
Securing Adjustable Dividers
For adjustable dividers, follow the manufacturer’s instructions to set them to the desired width. Once the dividers are properly adjusted, secure them using the appropriate mounting system. These dividers offer more flexibility in organizing cables, allowing for easy modification in the future. Proper securing of adjustable dividers ensures that they stay in place and provide the necessary separation between cables.
Ensuring Proper Spacing
Proper spacing between dividers is essential for maintaining organized cables. Typically, dividers should be spaced 1-2 inches apart, depending on the cable size and tray. For high-voltage or sensitive cables, consider adding extra space to minimize interference. Proper spacing allows cables to remain well-separated, reducing the risk of overheating, signal degradation, or physical damage. This helps ensure efficient performance of the cable management system.
Best Practices for Installation
Start installing dividers from one end of the tray and work your way across to maintain consistency. Double-check the alignment of each divider before securing it, ensuring they are evenly spaced and organized. Staggering dividers can help create a uniform cable path and reduce the risk of overcrowding. Make sure each divider is securely fastened to prevent shifting, ensuring long-term stability and functionality of the system.
Why Use an Inverted Cable Tray for Efficiency
Best Practices for Cable Tray Divider Installation:Professional Manual
When performing cable tray divider installation, it’s essential to follow best practices to ensure that the system is organized, safe, and efficient. Proper installation helps maintain cable integrity, minimize signal interference, and comply with regulatory standards. Referring to a Professional Manual during the installation process can provide valuable guidance on the most effective techniques.
Advantages of Cable Management Best Practices
- Increased Cable Longevity: Proper cable organization reduces physical stress on cables, helping them last longer and reducing the likelihood of damage.
- Easier Maintenance: An organized tray makes it easy to identify and access specific cables for repair, replacement, or upgrades.
- Reduced Risk of Downtime: Proper cable management through a cable tray system plays a crucial role in reducing the risk of downtime. A thorough cable tray risk assessment can help identify potential issues, such as short circuits, overheating, or signal degradation, and address them proactively.
Avoiding Signal Interference
Signal interference is a critical concern when working with cables, especially for sensitive data and communication systems. A key advantage of cable tray dividers is their ability to help minimize electromagnetic interference (EMI) and protect cables from damage.
How Dividers Help Minimize Electromagnetic Interference and Protect Sensitive Data Cables
- Separation of Power and Data Cables: One of the main ways that cable tray dividers help reduce interference is by separating power cables from data or communication cables. Power cables often generate electromagnetic fields that can interfere with the signals carried by data cables. By creating a physical barrier between these cable types, dividers reduce the potential for cross-talk and signal degradation.
- Preventing Overcrowding: Dividers help maintain proper spacing between cables, ensuring that they are not bundled together too tightly. Overcrowded cables are more likely to experience interference, as their proximity to one another increases the risk of signal overlap or degradation.
- Shielding: Some cable tray dividers come with additional features like metal shielding or conductive materials, which can further reduce EMI. These shields can be particularly useful in environments with high-voltage power cables or industrial equipment that generate significant electromagnetic fields.
Advantages of Avoiding Signal Interference
- Improved Data Integrity: Minimizing signal interference ensures that data transmission is stable and reliable, which is crucial for systems like fiber-optic networks, communication lines, and high-speed data connections.
- Enhanced System Performance: By reducing interference, you ensure that your cables and devices perform at their best, avoiding signal drops, slowdowns, or disruptions in critical applications.
- Longer Cable Lifespan: Keeping cables free from electromagnetic damage can extend their functional lifespan, reducing the need for costly replacements or repairs.
NEC Compliance and Safety Guidelines
Compliance with the National Electrical Code (NEC) and other relevant safety standards is essential during the cable tray divider installation process. Adhering to these standards ensures that the installation is not only efficient but also safe for both the installation team and end users.
Overview of Relevant Standards and Regulations for Divider Installation
- NEC Article 392 – Cable Trays: According to the NEC, cable trays must be designed and installed to accommodate the intended cable load, and cable tray divider installation must not obstruct the tray’s intended function. Proper spacing between dividers, trays, and cables is necessary to prevent overheating or excessive wear.
- Separation of Cables: The NEC also requires that certain types of cables, such as power and communication cables, be physically separated within the tray. This can be achieved through the use of cable tray dividers that provide proper compartmentalization.
- Fire and Safety Regulations: Depending on the installation environment, NEC guidelines may require the use of fire-resistant or flame-retardant dividers. These dividers are essential in settings where fire hazards are a concern, such as in commercial buildings, industrial facilities, or data centers.
- Accessibility for Maintenance: The NEC mandates that cables must be accessible for maintenance or modification. Cable tray dividers should not impede access to cables for inspection or repairs. Proper divider installation ensures that cables remain accessible and can be easily accessed for future upgrades or troubleshooting.
Advantages of NEC Compliance
- Safety Assurance: Compliance with the NEC reduces the risk of electrical hazards, such as fires or electrical shocks, ensuring that the system is safe for use.
- Legal and Insurance Protection: Adhering to NEC standards ensures that the installation is up to code, which can prevent legal issues and help maintain insurance coverage.
- Long-Term Reliability: By following industry standards, you are ensuring that the cable tray divider installation will remain effective and safe for the long term, avoiding costly issues that can arise from non-compliance.
Maintenance and Inspection of Cable Tray Divider Installation
Proper maintenance and periodic inspection of cable tray dividers are essential for ensuring the ongoing safety, efficiency, and longevity of the cable management system. Regular checks and timely adjustments are crucial to preventing issues like cable damage, signal interference, and improper cable routing. A well-maintained system also ensures that the cable tray divider installation remains secure and functional. In this section, we will explore the importance of regular inspections, tips for cleaning and adjusting dividers, and troubleshooting common installation issues that may arise over time.
Routine Inspection
Regular inspection of cable tray dividers is critical to ensuring the integrity of the system and preventing potential safety hazards. It is recommended to schedule inspections periodically to check for signs of wear, misalignment, or other issues that could affect the functionality of the cable management system.
Importance of Regular Checks for Divider Stability and Cable Integrity
- Divider Stability: Over time, dividers may become loose or shift position due to vibrations, thermal expansion, or general wear and tear. It is essential to check that dividers are securely fastened within the cable tray to maintain proper separation and prevent accidental movement.
- Cable Integrity: Cables can become damaged if the dividers are not adequately maintaining the appropriate spacing or if they become misaligned. Inspect the cables to ensure they are free from abrasions, cuts, or other signs of physical damage that could compromise performance.
- Spacing and Alignment: Proper spacing between cables is necessary to prevent overheating or signal degradation. During the inspection, ensure that the dividers are positioned to provide adequate separation between different cable types, such as power and data cables.
- Safety Compliance: Regular inspections ensure that the cable tray system is compliant with relevant safety standards, such as the NEC. This includes ensuring that dividers are properly secured, cables are organized, and no part of the system is obstructing airflow or causing potential hazards.
Tips for Cleaning and Adjusting Dividers
Cleaning and adjusting dividers are key aspects of maintaining an organized and efficient cable tray system. Keeping dividers clean and properly adjusted ensures they continue to perform effectively without causing disruptions in cable management. Regular maintenance of the dividers not only enhances their longevity but also ensures the overall performance of the cable tray system remains at optimal levels.
Gentle Cleaning
To clean the dividers, use a soft cloth or a gentle brush to remove dust, dirt, and debris. This helps maintain the dividers’ appearance and functionality. Avoid harsh chemicals or abrasive cleaning tools, as they can damage the dividers or the cables housed within the tray. Harsh cleaners might also degrade the material integrity of the dividers or leave residues that attract more dirt.
Avoid Cable Disturbance
When cleaning or adjusting dividers, ensure that you don’t disturb the cables inside the tray. The cables should remain in their designated positions to avoid interference with their functionality or physical damage. To minimize disturbance, use non-invasive tools like a vacuum with a soft nozzle to remove dust without shifting cables. This ensures that the cables stay properly routed and organized, maintaining the integrity of the cable management system.
Repositioning Dividers
Over time, dividers may become misaligned or shift due to vibrations, temperature fluctuations, or general wear. If dividers need to be repositioned, do so carefully to ensure cables remain properly separated and organized. If the dividers have become loose, secure them with additional fasteners or supports to prevent them from shifting out of place. Regularly adjusting and realigning dividers helps maintain proper cable spacing, reducing the risk of overheating, signal degradation, or physical damage to cables.
Lubricating Moving Parts
For flexible or adjustable dividers, it’s essential to lubricate moving parts lightly with a non-corrosive lubricant. Lubricating the dividers helps ensure smooth operation, preventing sticking or wear over time. Be sure to use a lubricant suitable for the materials of the dividers to avoid corrosion or degradation. Regular lubrication also helps maintain the divider’s flexibility, especially in systems where the dividers are adjustable or need to accommodate various cable sizes.
Troubleshooting Common Issues
Despite careful installation and maintenance, several issues may arise during the lifespan of a cable tray system. These issues can affect the functionality and safety of the system. Below, we discuss common problems and how to address them.
Misaligned Dividers
Misalignment of dividers can occur due to vibrations, thermal expansion, or improper installation. When dividers are misaligned, they may no longer maintain proper separation between cables, which can lead to overheating, signal degradation, or physical damage to cables. To address misalignment, check if the fasteners or attachments have loosened, and realign the dividers to their original position. Secure them properly to prevent future misalignment. If misalignment persists, consider adding extra supports or brackets to keep the dividers in place.
Loose Attachments
Loose attachments, such as bolts, screws, or clips, can cause instability in the cable tray system. If attachments are not securely fastened, dividers can shift, become unstable, or become misaligned with the cables, affecting the organization and safety of the system. Regularly inspect all fasteners and tighten or replace any that are loose or worn. For dividers using adjustable clips, ensure that they are correctly aligned and securely attached to maintain the system’s stability.
Cable Congestion
Cable congestion occurs when cables in the tray become bunched together or improperly routed, often due to insufficient spacing between cables or dividers failing to maintain proper organization. This can lead to overheating, signal degradation, and even cable damage. To address cable congestion, inspect the tray to ensure adequate spacing between cable types, such as power and data cables. If needed, reposition dividers or add more dividers to improve cable separation. Proper organization of the cables will ensure efficient airflow and reduce the risk of issues arising from overcrowded trays.
Overloaded Trays
Overloading a cable tray can occur when there are too many cables in the tray, leading to strain on the dividers and potentially causing compression or misalignment. Overloaded trays also result in improper support for cables, which can cause wear and tear over time. To avoid overloading, perform a cable tray loading assessment to ensure the tray can handle the load. If the tray is overloaded, redistribute the cables to maintain an even load. In some cases, it may be necessary to upgrade the tray or dividers to a larger size to accommodate the additional load and prevent future problems.
FAQs about Cable Tray Divider Installation
The BS standard for cable tray installation is BS EN 61537:2007, providing guidelines for the design, materials, testing, and installation of cable tray systems. It ensures that cable trays, used in industrial, commercial, and infrastructure applications, meet safety and performance standards. The standard covers key aspects like strength, load-bearing capacity, and corrosion resistance, which is crucial for harsh environments like chemical plants or outdoor settings. It also specifies proper installation methods, including alignment, mounting, and secure fixing, to maintain stability and functionality over time. Additionally, BS EN 61537 ensures trays protect cables from mechanical damage, temperature changes, and other environmental factors. Adhering to this standard during installation is essential for ensuring safety, reliability, and durability in cable management systems.
To install cable tray rollers, start by gathering the necessary tools and materials, including cable tray rollers, mounting brackets, screws, a drill, measuring tape, and a level. Begin by determining the correct placement for the rollers, typically at the entry and exit points or where horizontal movement is required. Mark the positions for the mounting brackets on the surface, ensuring they are level, then drill holes and secure the brackets with screws or bolts. After installing the brackets, attach the rollers to the brackets, ensuring they are evenly spaced and securely fastened. Use a level to align the rollers both vertically and horizontally, ensuring smooth and unobstructed movement of the cable tray. Once the rollers are in place, test the tray’s movement to ensure it moves freely and without resistance. Finally, perform a thorough inspection to ensure everything is securely installed and aligned, allowing for smooth operation and long-term functionality.
Yes, cables can be spliced in a cable tray, but it is essential to follow proper guidelines to ensure safety and compliance with electrical codes. Splicing should adhere to relevant standards, such as the NEC or local regulations, to avoid hazards. Adequate protection for the splice is necessary to prevent mechanical damage, corrosion, or environmental exposure, and splices should be housed in suitable junction boxes or enclosures. It’s also important to ensure sufficient space in the tray for both the cables and enclosures, as overcrowding can lead to damage or overheating. The splice should be accessible for future inspections or maintenance and should not be obstructed. Additionally, care must be taken to manage heat, as splices can generate heat, requiring that the tray and connectors be rated to handle it safely. Following these practices ensures the reliability and safety of the cable tray system.

As the editor of GangLong Fiberglass, I have years of experience and in-depth research, focusing on cable tray products, fiberglass solutions, and grille systems. I incorporate years of industry insights and practical experience into every content, committed to promoting the progress of the industry. At GangLong Fiberglass, my commitment is reflected in every product, from innovative cable trays to durable fiberglass solutions and sturdy grille systems. As an authoritative voice in the industry, my goal is to provide valuable information to professionals and businesses and promote forward-looking solutions.